How I built my blog with Jekyll and Poole
All the advice I’ve read about building a profile as a developer has impressed upon me how important it is to establish a blog and post to it regularly. In recent weeks I’ve experimented with Wordpress and Ghost but found both of these lacking in certain areas, so for the moment I’ve settled on using Jekyll. I only discovered Jekyll recently so I’ve had to rely on info from various blog posts (like this one by Joshua Lande) to add essential functionality to my blog.
Much like Joshua’s post I thought I’d detail my own setup in the hope it will be useful in encouraging others to give Jekyll a try. It’s not a complete how-to, more of a guide as to how to add some essential functionality once you’ve got Jekyll installed and a simple blog up and running.
No doubt I’ll continue to refine and improve things as I learn more about Jekyll, but this is what I’ve implemented so far.
Choosing a Theme
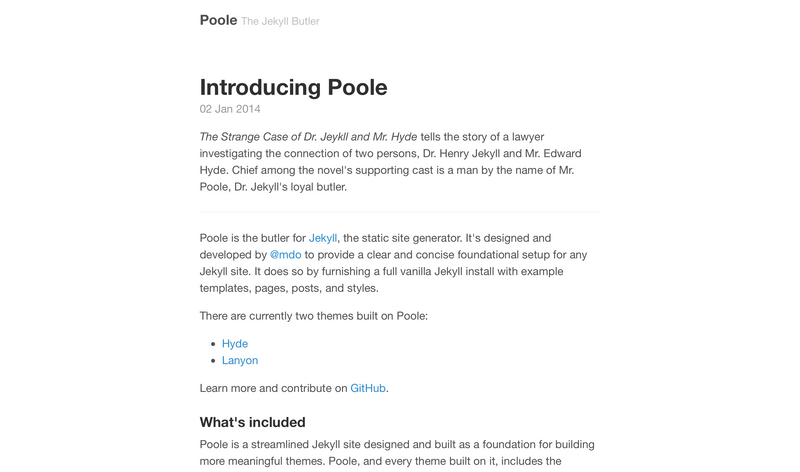
I figured choosing a theme was a good place to start. I wanted something with a minimalist look so I could focus on adding new posts consistently, rather than getting too caught up in the way the site looked. I came across Poole thanks to the post by Joshua Lande above and immediately thought this would be a great foundation given its clean, minimal, modern look. Poole is the work of Mark Otto, and he’s also responsible for the Hyde and Lanyon themes which are two more great choices if you want a clean-looking theme where the focus will be on your writing.
Poole has a responsive layout and is ready to go out-of-the-box with sample posts, RSS feed, custom 404 page and code highlighting all included. Using a static site generator like Jekyll may seem daunting initially but I’d never touched Jekyll previously and I was able to get up and running quickly with Poole.
Pretty(er) Permalinks
Out-of-the-box, Jekyll’s permalinks look like this:
https://dgwolff.com/2015/05/18/how-i-built-my-blog-with-jekyll-and-poole/
I wanted to clean the URL structure up a bit so it was less “cluttered”. I did this by adding a permalink: variable to my post front matter so I can now define a permalink of my own choosing for each post. I also added the /posts path to add a sense of structure to my URLs.
The front matter for this post:
---
permalink: /posts/blog-jekyll-poole/
---
produces:
https://dgwolff.com/posts/blog-jekyll-poole/
which looks a lot cleaner and is more SEO-friendly. I still need to work out how to remove the trailing slash from URLs but that probably needs to be changed in the web server configuration (Apache in my case).
Making Posts Look Better in Search Results
Having decided to start a blog, I’d obviously like to have as many people reading it as possible and one way to help the visitor stats tick over is to provide meaningful titles and descriptions for posts so these will appear in search engine results. I achieved this by adding the below code to the <head> block in the _includes/head.html file:
{% if page.title %}
  <title>{{ page.title }} · {{ site.title }}</title>
{% else %}
  <title>{{ site.title }}</title>
{% endif %}

{% if page.description %}
  <meta name="description" content="{{ page.description }}"/>
{% else %}
  <meta name="description" content="{{ site.description }}"/>
{% endif %}
With title: and description: variables in the front matter of my post template I can set a page title and description on a per-post basis. With the above code, if I fail to set a title and/or description for a post it will use the default values I’ve defined in _config.yml. If you don’t provide a specific description or a fallback, search engines will use the first 155-160 characters of the post as the description in search results.
This is what this post looks like in Google’s results without a description provided:

With a description provided, it looks like this:

The second example looks more “polished” and is more likely to entice the user to click the link and read the post. Moz has more on meta descriptions.
Building a Sitemap
Now that I was providing meaningful descriptions for search engines to display for each of my posts, the next step was to build a sitemap to help them find all of the pages on my site. Poole doesn’t come with a sitemap by default so I had to do some digging around to find a suitable solution, and fortunately I came across this post by David Ensinger (I’ve followed David’s example to the letter so I won’t duplicate the code here). I could have used a plugin (like jekyll-sitemap) to generate a sitemap however I like to keep things as simple as possible with no unnecessary dependencies and David’s is a clean, elegant solution that works great.
Minifying HTML, CSS & JavaScript Files
Having generated a sitemap to make indexing the site easy and hopefully help draw visitors to it, the next step was to ensure the site loads as quickly as possible. One of the first logical steps toward achieving this was to “minify” the site’s HTML, CSS & JS files as doing this can greatly reduce file sizes.
From Wikipedia:
Minification (also minimisation or minimization), in computer programming languages and especially JavaScript, is the process of removing all unnecessary characters from source code without changing its functionality. These unnecessary characters usually include white space characters, new line characters, comments, and sometimes block delimiters, which are used to add readability to the code but are not required for it to execute.
This post by Andrei Mihu outlines one approach to doing this and it’s the one I ended up going with.
Optimising Images
Leveraging the info from Andrei’s post above, I added another task to my Rakefile to optimise all images before they are uploaded to the server. To do this I installed the image-optim gem and the associated image-optim-pack which provides the required binaries for compressing most image types.
I added the following code to my Rakefile and now I can optimise images in the images/posts folder by calling rake optimise:
IMAGES = "images/posts"
desc "optimise images using ImageOptim-CLI"
task :optimise do
  system "image_optim #{IMAGES} -r"
  puts "## Images optimised ##"
end
Estimating Reading Time
Something I’ve been seeing on a lot of blogs lately is estimated reading times for posts. My attention span is a short as anyone’s and I know I’m more likely to read a post if I can get through it in a few minutes so I decided to implement this on my blog too.
I created a reading_time.rb file in my _plugins directory and added the following code that I found here:
module ReadingTimeFilter
  def reading_time(input)
    words_per_minute = 180

    words = input.split.size;
    minutes = (words / words_per_minute).floor
    minutes_label = minutes == 1 ? " minute" : " minutes"
    minutes > 0 ? "#{minutes} #{minutes_label}" : "less than 1 minute"
  end
end

Liquid::Template.register_filter(ReadingTimeFilter)
I then modified the code in _layouts/post.html to call the method:
<ul class="post-header">
  <li><time datetime="{{ page.date | date_to_xmlschema }}" class="post-date">
    {{ page.date | date_to_string }}</time></li>
  <li class="read-time"><i class="fa fa-clock-o"></i>
    {{ page.content | reading_time }}</li>
</ul>
I added the Font Awesome files so I can use <i class="fa fa-clock-o"></i> to add a clock icon which I think looks kind of cool.
Adding Social Sharing
Once people had found their way to my blog and read a post, I wanted it to be easy for them to share it. I initially added the usual buttons you see for sharing on Twitter, Facebook and Google+ but I felt these detracted from the minimal layout and wondered whether Facebook was a suitable place for my blog to be shared anyway, given the subject matter.
I decided to replicate Joshua Lande’s solution and add a simple, unobtrusive tagline for sharing on Twitter to the end of each of my posts by creating the file _includes/twitter_plug.html and adding the following code:
<p>Enjoyed this post?
<a href="https://twitter.com/intent/tweet?url={{ site.url }}{{ page.url }}
  &text={{ page.title }}&via=dgwolff" target="_blank">
  share it with your followers</a>
or
<a href="https://twitter.com/dgwolff">
  follow me on Twitter</a>!</p>
I then added the following code to my _layouts/post.html file:
{% if page.twitter_plug %}
  {% include twitter_plug.html %}
{% endif %}
I can now choose to include this line on a per-post basis by adding twitter_plug: true to the front matter.
Adding Comments with Disqus
The last major feature I wanted to add was the ability for people to comment on posts. Enabling comments is a great way to build a community around your blog and also to engage with people who may not be inclined to take the time to email you or look you up on Twitter. I looked at a few options but I liked the look of Disqus the most so that’s what I went with.
Adding the Disqus code to your site is easy (it’s provided when you add a new site to your account); I added mine to _includes/comments_code.html and added the following code to _layouts/post.html:
{% if page.comments %}
  {% include comments_code.html %}
{% endif %}
I can choose whether to enable comments for each individual post by adding the relevant code to the front matter.
Wrap Up
That’s pretty much it. The next challenge is to attract traffic to the site but I’m hopeful that will be taken care of to some extent by posting useful, well-written content on a regular basis. There’s still more functionality I’d like so add and I’ll cover this in future posts. It would be great to hear from you if you found this post helpful.